If hair appears and disappears after you remove a video background, pause on the first bad frame. Compare it with the frames just before and after it. If the outline changes sharply while the subject barely moves, the mask is likely shifting between frames. Video editors often call this edge chatter.
To fix flickering video edges, isolate the problem with a short playback loop. Correct any missing parts of the subject first, then adjust the edge. The table below helps you decide which change to make.
Check where the flicker starts
- Duplicate the clip and loop the problem. Five to ten seconds around the first bad frame is enough. Keep the original handy so you can see what the mask removed.
- Swap between light and dark test backgrounds. A bright layer reveals dark fringes. A dark layer exposes light halos and makes holes in the subject easier to see.
- Step through the frames around the jump. Notice which part of the subject disappears, whether the outline changes in place, and whether the same flicker is visible in the original.
If the whole frame pulses in the original clip, check exposure or lighting first. If the pulse is confined to the new cutout edge, work on the mask. If the timeline looks clean, export a short sample to see whether the problem appears only after export.
Match the repair to what you see
| What you see | What to try first | How to check the repair |
|---|---|---|
| The same patch of hair appears and disappears | Refine the mask around the hair, then try a small increase in temporal smoothing if available. | Play the head turn at normal speed. The edge should follow the head without leaving a trail. |
| A finger or object vanishes for a few frames | Correct the mask on the first bad frame and check how the correction carries through. Add a separate mask if the editor supports it. | Step through the gesture and check that the missing part stays visible. |
| A bright rim stays around the shoulder | Use a slightly tighter edge or a spill reduction control if the rim comes from reflected background color. | Switch between light and dark test layers and check that the shoulder still has its original shape. |
| The outline is stable but looks jagged | Try a small amount of feathering. | Look at the edge at its final size. Reduce the feather if the subject takes on a blurry halo. |
For example, a baker lifts a white bowl in front of a pale wall. The bowl’s rim disappears for three frames. Softening the entire outline would leave those pixels missing. Correct the selection around the rim at the first bad frame, then follow it through the lift. Compare with the original to confirm you preserved the bowl’s shape.
Refine the mask before adding smoothing
If your editor offers a brush for including or excluding pixels, use it on the first bad frame. Limit corrections to the area that failed. Then check several frames in both directions. Automatic tracking may carry a correction forward, so watch the nearby frames for new errors.
If you started with automatic removal in CapCut, its Remove BG panel also shows a Custom removal option. Adobe After Effects offers Refine Edge for detailed boundaries such as hair and Reduce Chatter for unstable edges. With any temporal smoothing control, increase it gradually while watching a turn or gesture. An outline that lags behind the movement needs less smoothing. Adobe’s guide to Roto Brush and Refine Matte.

When the tool offers no manual mask controls, trim around the hardest motion if the edit allows it, switch to a cleaner take, or replace the shot with a tighter crop. If you can reshoot, give the subject some distance from the wall and choose a background that separates clearly from hair, clothes, or the object being held. Unlimited AI’s video prompts guide.
Check the repair in the final export
Put the intended background back and play the clip at the size your audience will see. Then export the repaired section with the planned delivery settings and watch that file. If it looks worse than the timeline, compare a higher quality export at the same size and frame rate to help isolate a compression or resizing issue.
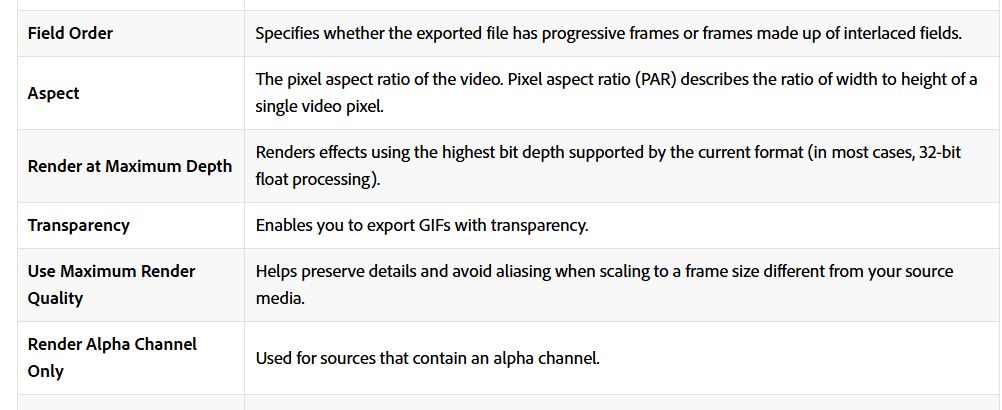
For a cutout you plan to reuse, import the test export and place a solid color beneath it. Confirm that the color shows through and the edges still hold up. Adobe lists format-dependent export options and describes alpha-only output as a separate setting. Adobe Premiere’s export settings reference.
Should I feather an edge that flickers?
Feathering softens a hard boundary. If the outline moves between frames, fix the mask or use an edge stabilization control first. Then use a little feathering if the stable edge still looks too sharp.
Why does the cutout look good when I pause?
A single frame can have an accurate outline even when neighboring frames disagree. Loop the troublesome moment after each adjustment and check it at normal speed before judging the repair.